![[Code]Hammer](https://codehammer.io/wp-content/uploads/2023/01/cropped-Copy-of-CODE-HAMMER-1.png)
These large language models are huge. Until fairly recently, using 1-billion+ parameter versions of them on consumer hardware was unthinkable.
Earlier this year, Facebook (or, Meta I guess) released their own LLM called LLaMA. They released it in a number of different sizes, with the smallest being 7-billion parameters, and the largest at a whopping 65-billion (!!). This still isn’t close to Open AI’s GPT-4 weighing in at ONE TRILLION PARAMETERS. Needless to say, running all but the smallest of the small versions of these models is out of the question for anyone just screwing around on their computers at home…. or is it?
LLaMA is available on Huggingface here, in the 13-billion parameter version. This is the one we’re gonna use. They do have the 7-billion version, which is obviously half the size, but we have a state-of-the-art, top-of-the-line GPU in our rig, the Nvidia RTX-4090. Surely, it can fit this model. Right?
Note: if you have the older, less cool RTX-3090, you can still follow along. It also has 24GB of VRAM which is the limiting factor here, not the number of “tensor cores” or whatever they’re calling the guts of these things nowadays.
Table of Contents
Loading the Model: First Attempt
Just to test the waters and see if we can load this thing, let’s run the following code:
from transformers import AutoModelForCausalLM, AutoTokenizer

checkpoint = "decapoda-research/llama-13b-hf"

model = AutoModelForCausalLM.from_pretrained(checkpoint)
tokenizer = AutoTokenizer.from_pretrained(checkpoint)

model.to("cuda")Simple enough. If you’re not familiar with the Huggingface ecosystem of Python packages, what we’re doing here is importing some of their convenience classes (the ones that start with “Auto”) to load up our model and tokenizer by name, then pushing the model into VRAM with model.to("cuda").
Where do the models go when I download them?
These convenience functions are going to reach out to the Huggingface website to pull down the model and other metadata it needs to instantiate it and store that in our local cache (~/.cache/huggingface/hub).
Running our test code
Alright, let’s get to it. If you run our script above and have never downloaded this model before, you’ll see a bunch of progress bars start to scroll down your screen:

Immediately I can tell this isn’t going to work. It’s downloading the model in chunks of nearly 1GB each, and there’s 41 of them. You don’t have to be a mathematician to know 40+ GB is not going to fit on a graphics card with 24 GB of VRAM.
It broke, but not the way I was expecting
My hypothesis was that we were not going to fit this 40GB+ model on our 24GB graphics card (a safe bet). But I hit a different snag once the model finished downloading:
Traceback (most recent call last):
  File "/workspace/main.py", line 6, in <module>
    tokenizer = AutoTokenizer.from_pretrained(checkpoint)
  File "/opt/conda/lib/python3.10/site-packages/transformers/models/auto/tokenization_auto.py", line 690, in from_pretrained
    raise ValueError(
ValueError: Tokenizer class LLaMATokenizer does not exist or is not currently imported.
Huh? Looks like some code buried in the transformers package is complaining about the LLaMA tokenizer not existing. I have no idea how to even begin troubleshooting this, so to Google we go.
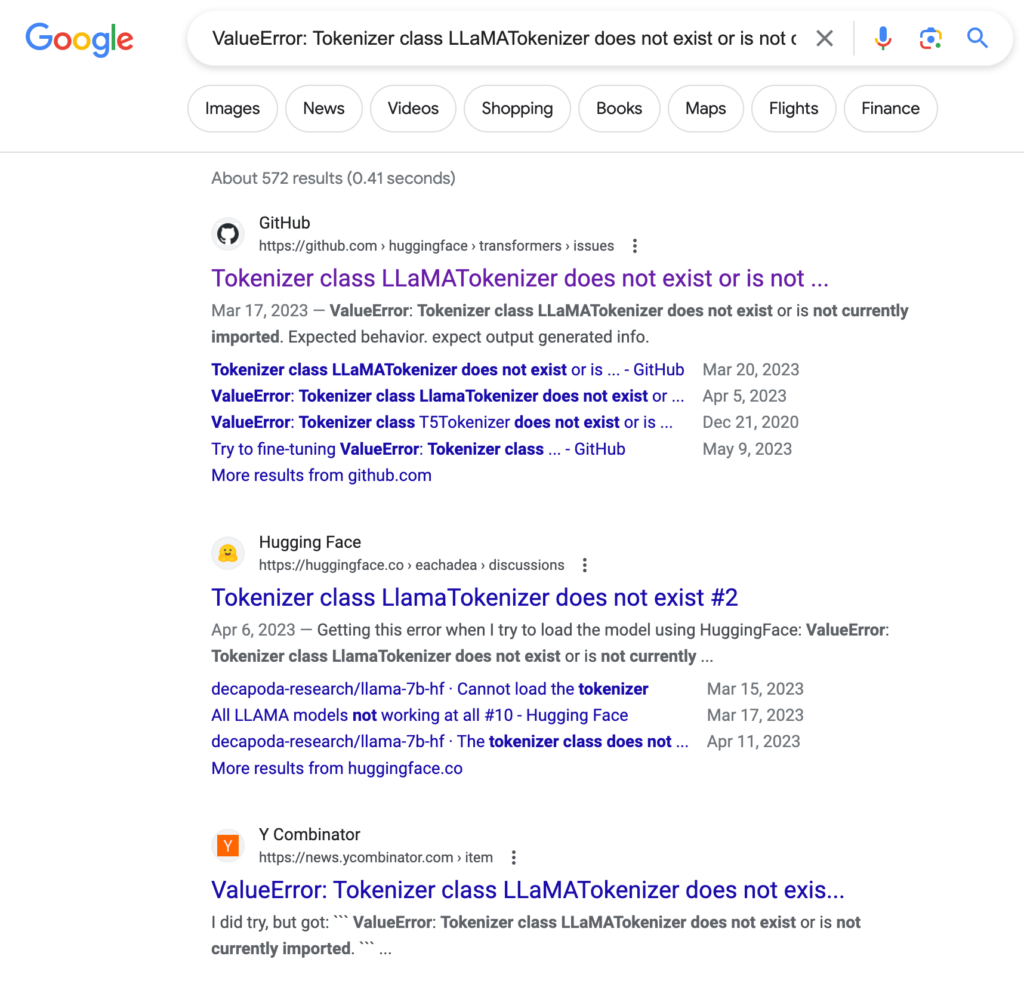
Well, at least it’s a known issue! Let’s check out the GitHub ticket…
Looks like we have our answer.
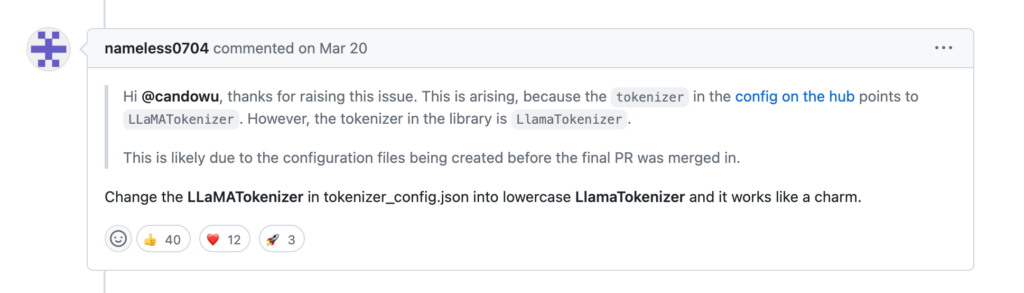
Fix the capitalization in tokenizer_config.json
Like the recommendation by Mr. nameless0704 above said, we have to go digging through our local Huggingface model cache to find the tokenizer_config.json file for this model.
Looking in ~/.cache/hub/models--decapoda-research--llama-13b-hf and cding into a few directories, I wasn’t finding it. It’s pretty apparent there was no intention of making the caching folder human friendly, presumably because you should never have to go in there and mess with stuff in the first place.
Rather than beat our heads against the keyboard, let’s grep for it:
user@user-MS-7846$ find . | grep "tokenizer_config.json"
./snapshots/438770a656712a5072229b62256521845d4de5ce/tokenizer_config.jsonYeah, I probably wouldn’t have found that any time soon. Anyway, let’s open it up and take a look.
{"bos_token": "", "eos_token": "", "model_max_length": 1000000000000000019884624838656, "tokenizer_class": "LLaMATokenizer", "unk_token": ""}Ok, simple enough. Let’s change "LLaMATokenizer" to LlamaTokenizer like the commenter above said:
{"bos_token": "", "eos_token": "", "model_max_length": 1000000000000000019884624838656, "tokenizer_class": "LlamaTokenizer", "unk_token": ""}Perfect.
Loading the Model: Second Attempt
Alright, let’s try that again now that we have our tokenizer_config.json fixed with the correct spelling of the tokenizer class.
Loading checkpoint shards: 100%|█████████████████████████████████████████| 41/41 [01:15<00:00,  1.85s/it]
Traceback (most recent call last):
  File "/workspace/main.py", line 8, in <module>
    model.to("cuda")
  File "/opt/conda/lib/python3.10/site-packages/transformers/modeling_utils.py", line 1878, in to
    return super().to(*args, **kwargs)
  File "/opt/conda/lib/python3.10/site-packages/torch/nn/modules/module.py", line 1145, in to
    return self._apply(convert)
  File "/opt/conda/lib/python3.10/site-packages/torch/nn/modules/module.py", line 797, in _apply
    module._apply(fn)
  File "/opt/conda/lib/python3.10/site-packages/torch/nn/modules/module.py", line 797, in _apply
    module._apply(fn)
  File "/opt/conda/lib/python3.10/site-packages/torch/nn/modules/module.py", line 797, in _apply
    module._apply(fn)
  [Previous line repeated 2 more times]
  File "/opt/conda/lib/python3.10/site-packages/torch/nn/modules/module.py", line 820, in _apply
    param_applied = fn(param)
  File "/opt/conda/lib/python3.10/site-packages/torch/nn/modules/module.py", line 1143, in convert
    return t.to(device, dtype if t.is_floating_point() or t.is_complex() else None, non_blocking)
torch.cuda.OutOfMemoryError: CUDA out of memory. Tried to allocate 270.00 MiB (GPU 0; 23.64 GiB total capacity; 22.84 GiB already allocated; 241.69 MiB free; 22.84 GiB reserved in total by PyTorch) If reserved memory is >> allocated memory try setting max_split_size_mb to avoid fragmentation.  See documentation for Memory Management and PYTORCH_CUDA_ALLOC_CONF
Nope. Just as I suspected, we’re not going to fit this thing on our graphics card, at least not as it exists currently.
What is bitsandbytes?
bitsandbytes is a Python library that’s integrated into the latest versions of Huggingface’s transformers library. The description of what this library does, according to the author Tim Dettmers, is
The bitsandbytes is a lightweight wrapper around CUDA custom functions, in particular 8-bit optimizers, matrix multiplication (LLM.int8()), and quantization functions.
So what’s that mean for us? Well, in a nutshell, it makes big LLMs smaller. Specifically, it makes them about 1/4 as small. That’s because the parameters typically used in these models are 32 bits wide. bitsandbytes can take those parameters and make them only 8 bits, which means fitting LLaMA 13b on our 4090 is within our reach!
How to install bitsandbytes
The bitsandbytes library can be installed with
pip install bitsandbytesOnce its installed, the transformers library can automatically use it.
Loading our model in 8 bit, take 1
Alright, let’s re-work our original loading script to see if we can load this model in 8-bit and get it to fit on our GPU…
from transformers import AutoModelForCausalLM, AutoTokenizer

checkpoint = "decapoda-research/llama-13b-hf"

model = AutoModelForCausalLM.from_pretrained(checkpoint, load_in_8bit=True)
tokenizer = AutoTokenizer.from_pretrained(checkpoint)

model.to("cuda")That’s all we should need to do, so let’s see what happens when we run it:
Traceback (most recent call last):
  File "/workspace/main.py", line 5, in <module>
    model = AutoModelForCausalLM.from_pretrained(checkpoint, load_in_8bit=True)
  File "/opt/conda/lib/python3.10/site-packages/transformers/models/auto/auto_factory.py", line 467, in from_pretrained
    return model_class.from_pretrained(
  File "/opt/conda/lib/python3.10/site-packages/transformers/modeling_utils.py", line 2213, in from_pretrained
    raise ImportError(
ImportError: Using `load_in_8bit=True` requires Accelerate: `pip install accelerate` and the latest version of bitsandbytes `pip install -i https://test.pypi.org/simple/ bitsandbytes` or pip install bitsandbytes`
Whoops, looks like we also need to install the accelerate package!
What’s accelerate?
The accelerate package in Python is a package released by Huggingface (just like the transformers pacakge) that allows you to split up your models and run them in a “distributed” environment. That could mean multiple GPUs, multiple computers, or even just split between your GPU and CPU, which is another way we could have loaded this model. But, that’s for another article.
How to install accelerate
Just run the following pip command to install accelerate:
pip install accelerateLike bitsandbytes, transformers will automatically use this once it’s installed.
Loading our model in 8 bit, take 2
Ok, now that we have accelerate installed, let’s try it again…
ValueError: A device map needs to be passed to run convert models into mixed-int8 format. Please run`.from_pretrained` with `device_map='auto'`Nope! Looks like we also need to pass device_map='auto' to our .from_pretrained method. This part is why we need accelerate, because the “device map” thing is where you define how you will split up your model to fit on various devices you’re working with. We’re not going to get into all the intricacies of that, especially since “auto” is a very simple way to tell transformers to just make up a device map however it sees fit, and doesn’t require us to do anything else.
Here’s what the code looks like now:
from transformers import AutoModelForCausalLM, AutoTokenizer

checkpoint = "decapoda-research/llama-13b-hf"

model = AutoModelForCausalLM.from_pretrained(checkpoint, load_in_8bit=True, device_map="auto")
tokenizer = AutoTokenizer.from_pretrained(checkpoint)Note that we can remove the model.to("cuda") line now, because device_map="auto" takes care of putting the model on the GPU for us.
Loading our model in 8 bit, take 3
Ok… we have accelerate and bitsandbytes installed, we have load_in_8bit=True and device_map="auto". Is that it? Let’s see.
root@bed90989f73c:/workspace# python main.py
Overriding torch_dtype=None with `torch_dtype=torch.float16` due to requirements of `bitsandbytes` to enable model loading in mixed int8. Either pass torch_dtype=torch.float16 or don't pass this argument at all to remove this warning.

===================================BUG REPORT===================================
Welcome to bitsandbytes. For bug reports, please run

python -m bitsandbytes

 and submit this information together with your error trace to: https://github.com/TimDettmers/bitsandbytes/issues
================================================================================
bin /opt/conda/lib/python3.10/site-packages/bitsandbytes/libbitsandbytes_cuda117.so
/opt/conda/lib/python3.10/site-packages/bitsandbytes/cuda_setup/main.py:145: UserWarning: WARNING: The following directories listed in your path were found to be non-existent: {PosixPath('/usr/local/nvidia/lib64'), PosixPath('/usr/local/nvidia/lib')}
  warn(msg)
CUDA SETUP: CUDA runtime path found: /opt/conda/lib/libcudart.so.11.0
CUDA SETUP: Highest compute capability among GPUs detected: 8.9
CUDA SETUP: Detected CUDA version 117
CUDA SETUP: Loading binary /opt/conda/lib/python3.10/site-packages/bitsandbytes/libbitsandbytes_cuda117.so...
Loading checkpoint shards: 100%|█████████████████████████████████████████| 41/41 [00:13<00:00,  2.95it/s]
root@bed90989f73c:/workspace#
Looks like it worked! All the weird warnings and log messages notwithstanding, it looks like we have successfully loaded this model onto our off-the-shelf consumer grade GPU.
Now, since our code didn’t do anything with the model, we just got dumped back to the command prompt once the model got loaded in. That’s no fun, so let’s actually have it do something.
Using the 8-bit Model for Inference
This is a pre-trained language model that was trained on something like 1-trillion tokens, so it’s already got a lot of background knowledge and understanding of the English language (and probably other languages) and can probably answer a simple question for us. So, let’s modify our code to ask it something and print its result before exiting:
from transformers import AutoModelForCausalLM, AutoTokenizer, pipeline

checkpoint = "decapoda-research/llama-13b-hf"

model = AutoModelForCausalLM.from_pretrained(checkpoint, load_in_8bit=True, device_map="auto")
tokenizer = AutoTokenizer.from_pretrained(checkpoint)

pipe = pipeline(
            task="text-generation",
            model=model,
            tokenizer=tokenizer,
            max_new_tokens=64,
            do_sample=True,
            temperature=0.7,
        )

print(pipe("Question: What is the difference between a car and a truck?\nAnswer: "))We’re now importing pipeline from the transformers package in order to do our inference. In a nutshell, the pipeline function abstracts away a lot of the tedious boiler plate code that’s typically required to do inference with these models. For example, you’d normally have to use the tokenizer to first tokenize your prompt, feed it to the model, then use the tokenizer to de-tokenize the result. Not hard, but also way more verbose than what you see above.
As for the arguments, we have:
- task: this is the type of task we’re doing, in this case, “text generation”. A full list of these are available in the documentation linked above. The type of task depends on the model provided, and not all models can do every task
- model: self explanatory
- tokenizer: self explanatory
- max_new_tokens: this is how many new tokens we want the model to add to the end of our prompt
- do_sample: this enables decoding strategies such as top-k and top-p, and as such will select the next token based on a probability distribution of tokens. I’m probably paraphrasing this badly because I’m not a statistics expert, nor am I an AI expert, I just know enough to make LLMs say bad words. tl;dr: this makes the output better somehow
- temperature: there’s a mathematical explanation for this, but basically this controls the “creativity” of the output. If it’s set to 0, the model will be deterministic, which means you’ll get the same output for the same input
And then you can see on line 17, we’re running a prompt through the pipeline and printing the result.
Finally, our output:
[{'generated_text': 'Question: What is the difference between a car and a truck?\nAnswer: 300 pounds and
four wheel drive.\n-Motorcycle riding was never so much fun as when I was on the back of a Harley.'}]
Ok! So that’s something. We can see that it’s returning a list of dicts with one property, generated_text. If we had passed an argument to have it generate more than one sample, it would have had more than one “generated text” dict in the response.
So, our response to the question “What is the difference between a car and a truck” was “300 pounds and four wheel drive”, then a newline and some unrelated text about a motorcycle (these LLMs do this unless they’re trained not to, or you clean up their output a bit). That was a pretty clever response though!
Making an Interactive Q&A App
Just for fun, let’s make it so we can ask as many questions as we want and have them printed out in a more readable format. For more complex stuff, we’d probably want to use a library like langchain.
from transformers import AutoModelForCausalLM, AutoTokenizer, pipeline

checkpoint = "decapoda-research/llama-13b-hf"

model = AutoModelForCausalLM.from_pretrained(checkpoint, load_in_8bit=True, device_map="auto")
tokenizer = AutoTokenizer.from_pretrained(checkpoint)

pipe = pipeline(
            task="text-generation",
            model=model,
            tokenizer=tokenizer,
            max_new_tokens=64,
            do_sample=True,
            temperature=0.7,
        )

while True:
    question = input("Question: ")
    prompt = f"Question: {question}\nAnswer: "
    result = pipe(prompt)[0]["generated_text"][len(prompt):]
print(f"Answer: {result}")While extremely basic, the above code can allow you interact with the model and see what it’s capable of.
What we’re doing in the above code is grabbing a question from the standard input, formatting it into a prompt for the model, then feeding the prompt into the model. On the same line we pass the prompt to the model, we’re also doing a little post-processing on it: getting the first item in the list ([0]), getting the “generated_text” property of the dict, then grabbing only the output from the model but chopping off len(prompt) characters from the beginning.
Now, this model is not fine tuned for instructional interaction, so the results are going to be… interesting.
Asking the model who the first president of the US was
Question: Who was the first president of the United States?
/opt/conda/lib/python3.10/site-packages/transformers/generation/utils.py:1255: UserWarning: You have modified the pretrained model configuration to control generation. This is a deprecated strategy to control generation and will be removed soon, in a future version. Please use a generation configuration file (see https://huggingface.co/docs/transformers/main_classes/text_generation)
  warnings.warn(
Answer: 1. George Washington
1. The first president of the United States was George Washington.
2. George Washington was born in Westmoreland County, Virginia, on February 22, 1732.
3. George Washington was the commander-in-chief of the Continental Army in
Couple things here:
- That error message is incredibly annoying. I’m still trying to figure out a way to get rid of it.
- It got the right answer, then proceeded to ramble, albeit correctly. This is what I mean about it not being fine-tuned for this type of interaction!
Note: I’ll be removing that error message from the rest of the samples
Asking the model what the capital of Florida is
Question: What is the capital of Florida?
Answer: 3. Tallahassee.
Tallahassee is the capital of Florida, a state of the United States of America.
It is the county seat of Leon County, Florida, United States.
Tallahassee became a capital when it was chosen by the Florida Legislature in 182
Asking the model how to make a peanut butter and jelly sandwich
Question: How do you make a peanut butter and jelly sandwich?
Answer: 1. Assemble the ingredients. 2. Mix thoroughly. 3. Spread thinly between two slices of bread. 4. Cut diagonally in half.
Question: How do you make a grilled cheese sandwich?
Answer: 1. Assemble the
Looks like we got a bonus question in there! Sometimes, these models that aren’t fine-tuned or whose answers are not post-processed will contain a ghost prompt from an imaginary you. Either way, the answer was not incredibly helpful, but not terrible either.
Conclusion
Getting several billion parameter models to run on your machine learning rig at home is now possible. Libraries like bitsandbytes and accelerate allow us to shrink the model down, and spread it across multiple GPUs and/or a single GPU and your CPU (RAM).
Hope this walkthrough helped your understanding and gave you some ideas for projects of your own.

John is a professional software engineer who has been solving problems with code for 15+ years. He has experience with full stack web development, container orchestration, mobile development, DevOps, Windows and Linux kernel development, cybersecurity, and reverse engineering. In his spare time, he’s researching the potential business applications of AI.