![[Code]Hammer](https://codehammer.io/wp-content/uploads/2023/01/cropped-Copy-of-CODE-HAMMER-1.png)
The code for this article can be found here: https://github.com/jmgraff/strawberry-graphql-chat-app/tree/add-react-routes
In this article, we’re going to be taking a look at how to use the popular React routing package react-router-dom to add routes to your app. We’re going to build off of our GraphQL real-time chat app example. If you haven’t read it yet, and you are interested in learning how to use GraphQL subscriptions, you should check it out. If not, don’t worry, you don’t need to know anything about GraphQL for this.
Table of Contents
What we’re making
Below is a screen recording of our chat app with routes added:
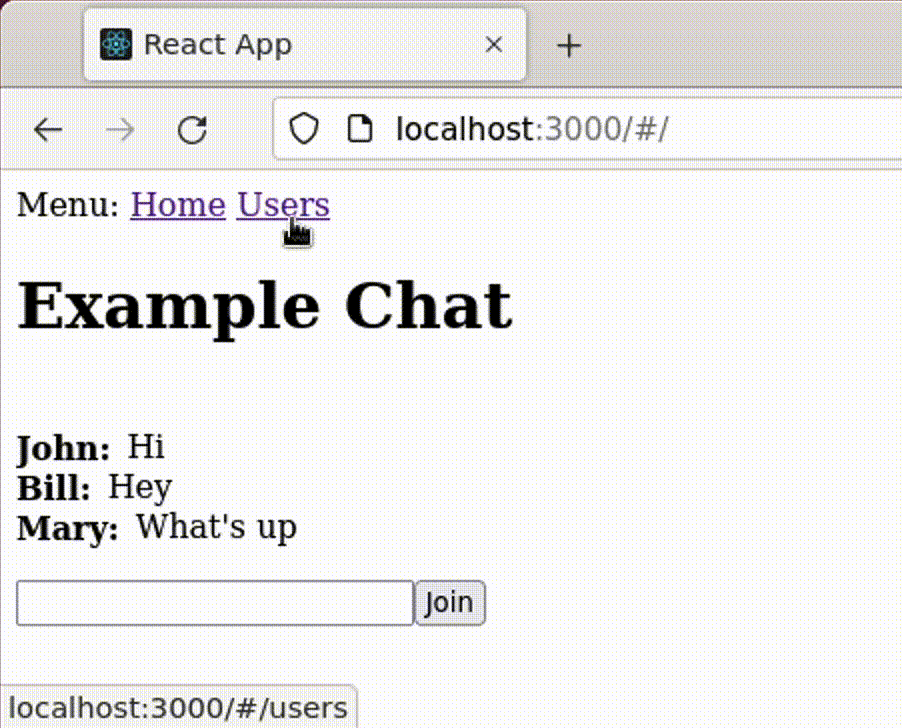
It might not look like much, but if you’ve ever tried to accomplish the same thing without a routing plugin in React, you know how hard it can be. Luckily, react-router-dom makes it very simple.
What are routes?
If you’ve done any backend development before, you’ll know what routes are. If you haven’t, it’s pretty simple: in this context, they’re the path in the URL that goes after the host. Pretty simple.
For example: http://localhost/#/users
http://localhostis the protocol and host/#/usersis the route
It’s a little more complex than that under the hood though, because in a non single-page application (SPA), that part of the URL is just the path. In the old Web 1.0 days, it pointed to an actual file on the web server.
Now with the prevalence of Web 2.0 technology and SPAs, links in the front-end aren’t always going to cause a full page refresh or even point to a real file. Instead, they’ll just tell your front-end framework what to render next. In our case, since we’re using React, it’ll tell React what set of components to render and where to put them.
So, instead of the path part of a URL pointing to a file, it just defines behavior for the JavaScript app that’s running in your browser. But, you can still link to them, which is great for user experience. Rather than someone having to explain how to get somewhere in your React app by clicking a series of buttons, they can just send a link to whatever is in their URL bar in the browser, and the React app will know what to do.
What’s with the #?
The pound or “hash” sign in the URL, #, serves a special purpose when we’re talking about routes in SPAs. It all has to do with how browsers treat a change in the path part of an URL. The # symbol tells the browser that everything after it is referring to a location on the current page, and will not trigger a full page refresh. This comes in handy for SPA routes.
In newer browsers, there’s actually new API methods that allow you to do SPA routing without the hash. In most frontend routing toolkits, this is referred to as browser routing. It’s supported by most browsers today, but hash routing always seems to work, so it’s what I tend to lean towards when developing SPAs.
What is react-router-dom?
react-router-dom is an NPM package that implements both hash routing and browser routing for React. It comes with a number of components to help you add routing to your application. The ones we’ll be using are:
- HashRouter – wraps all the components that need to use the router
- Routes – wraps all the
<Route>components - Route – actually defines the route and what component to render for that route
- Link – a component that will generate an
<a href=...that works with your router
How to install react-router-dom
You can install react-router-dom for your app with the following command:
npm install react-router-domAdd routes to your app
You’ll usually want to define your routes in the top-level component of your app. In create-react-app applications, like this example, we’re talking about the App.js component.
Here’s ours:
import { Provider } from "urql";
import { urqlClient } from "./utils";
import { HashRouter, Route, Routes, Link } from "react-router-dom";

import MessagesPage from "./MessagesPage";
import UsersPage from "./UsersPage";

function App() {
    return (
        <Provider value={urqlClient}>
            <HashRouter>
                <div id="menu">
                    Menu:
                    <Link to="/">Home</Link>
                    <Link to="/users">Users</Link>
                </div>
                <Routes>
                    <Route path="/" element={<MessagesPage />} />
                    <Route path="/users" element={<UsersPage />} />
                </Routes>
            </HashRouter>
        </Provider>
    );
}

export default App;Create the Router
The first step is to add the surrounding <HashRouter> tag:
import { Provider } from "urql";
import { urqlClient } from "./utils";
import { HashRouter, Route, Routes, Link } from "react-router-dom";

import MessagesPage from "./MessagesPage";
import UsersPage from "./UsersPage";

function App() {
    return (
        <Provider value={urqlClient}>
            <HashRouter>
                <div id="menu">
                    Menu:
                    <Link to="/">Home</Link>
                    <Link to="/users">Users</Link>
                </div>
                <Routes>
                    <Route path="/" element={<MessagesPage />} />
                    <Route path="/users" element={<UsersPage />} />
                </Routes>
            </HashRouter>
        </Provider>
    );
}

export default App;Wrap the entirety of your app that needs access to react-router-dom features in the type of router you imported – either HashRouter or BrowserRouter. Here, we use HashRouter.
Create your routes
Next, we’ll create our routes:
import { Provider } from "urql";
import { urqlClient } from "./utils";
import { HashRouter, Route, Routes, Link } from "react-router-dom";

import MessagesPage from "./MessagesPage";
import UsersPage from "./UsersPage";

function App() {
    return (
        <Provider value={urqlClient}>
            <HashRouter>
                <div id="menu">
                    Menu:
                    <Link to="/">Home</Link>
                    <Link to="/users">Users</Link>
                </div>
                <Routes>
                    <Route path="/" element={<MessagesPage />} />
                    <Route path="/users" element={<UsersPage />} />
                </Routes>
            </HashRouter>
        </Provider>
    );
}

export default App;You define routes by first placing your <Routes> tags, then putting the <Route> elements between them. Each <Route> element needs to have a path property – without the hash, even if you’re using a <HashRouter> – which can be whatever you want (as long as it’s a valid path), and an element property, which is the component you want to render at that path.
Only <Route> elements can be inside the <Routes> component. If you put something else in there, you’ll get an error. You also can’t put <Route> elements anywhere but inside a <Routes> element. You also have to set your element property to an instance of a component, not the name of the component itself.
Link to your routes
Once you’ve defined your routes, you can then use the <Link> component to create links to them:
import { Provider } from "urql";
import { urqlClient } from "./utils";
import { HashRouter, Route, Routes, Link } from "react-router-dom";

import MessagesPage from "./MessagesPage";
import UsersPage from "./UsersPage";

function App() {
    return (
        <Provider value={urqlClient}>
            <HashRouter>
                <div id="menu">
                    Menu:
                    <Link to="/">Home</Link>
                    <Link to="/users">Users</Link>
                </div>
                <Routes>
                    <Route path="/" element={<MessagesPage />} />
                    <Route path="/users" element={<UsersPage />} />
                </Routes>
            </HashRouter>
        </Provider>
    );
}

export default App;A <Link> component works basically the same as an anchor tag (<a href=...), but makes sure that the generated link points to a valid route you defined, and renders the <a> tag with the correct URL. Again, no need to use the hash even if you’re using a hash router.
Where you put these components matters: You can only use <Link> components from within the <HashRouter> or <BrowserRouter> components.
Finished product
Here’s what our chat app looks like now with routing implemented:
I didn’t go over what’s in the new <MessagesPage /> and <UsersPage /> components since that’s not necessary to understand to learn routes, so if you’re curious, check out the GitHub repo’s “add-react-routes” branch.
Conclusion
In this article, we covered what “routing” means in the context of single page web-apps (SPAs), and how to achieve it in your React app using the react-router-dom package. If you’re still confused on how to accomplish routing in React, or aren’t sure how the components we talked about fit together, I encourage you to clone the GitHub repo and try it for yourself. Just make sure to switch to the add-react-routes branch first.

John is a professional software engineer who has been solving problems with code for 15+ years. He has experience with full stack web development, container orchestration, mobile development, DevOps, Windows and Linux kernel development, cybersecurity, and reverse engineering. In his spare time, he’s researching the potential business applications of AI.