![[Code]Hammer](https://codehammer.io/wp-content/uploads/2023/01/cropped-Copy-of-CODE-HAMMER-1.png)
The code for this article is a template repository on GitHub, and can be found here: https://github.com/jmgraff/fastapi-strawberry-urql-supertokens. Feel free to use it as a starting point for your own apps.
SuperTokens is an open source authentication solution for the apps you build. You might be interested in something like SuperTokens if:
- You tried to roll your own authentication system and aren’t sure if it’s secure
- You’re currently using one that came with your framework of choice (like Django) and find it’s clunky or missing features
- You want to have full control of the look and feel of your log-in forms
- You don’t want to maintain the authentication system yourself
If any of that sounds like you, keep reading for an example of how to easily add SuperTokens as the authentication system for your app. We’re going to be building off of the app we set up in our full-stack GraphQL guide. But, don’t worry, this article isn’t about GraphQL and you don’t really need to understand it to see how we’re using SuperTokens. If you want to learn more about GraphQL, check out the article and come back.
Table of Contents
What we’re building
As I mentioned above, we’re building off the app we made in the full-stack GraphQL example. To keep things simple, we’re just going to be adding authentication to that example, as well as adding a very simple menu so we can sign in and sign out.
Here’s what it’ll look like:
Adding SuperTokens and MySQL to your stack
The first thing we need to do is add SuperTokens to our docker compose file, as well as MySQL, which SuperTokens uses to store authentication data:
services:
  backend:
    image: backend
    build: backend
    ports:
      - 8000:8000
    environment:
      - HOSTNAME=${HOSTNAME}
      - PROD=${PROD}
  frontend:
    image: frontend
    build: frontend
    ports:
      - 3000:3000
    environment:
      - REACT_APP_HOSTNAME=${HOSTNAME}
      - PROD=${PROD}
  mysql:
    image: mysql
    environment:
          MYSQL_ROOT_PASSWORD: root
          MYSQL_USER: supertokens
          MYSQL_PASSWORD: supertokens
          MYSQL_DATABASE: supertokens
  supertokens:
    image: supertokens/supertokens-mysql
    environment:
- MYSQL_CONNECTION_URI="mysql://supertokens:supertokens@mysql/supertokens"We’re using the default MySQL image from DockerHub, and setting the passwords via environment variables. This is ok for development, but you’ll probably want to store this information more securely in production. The database won’t be exposed though, only the SuperTokens container will be talking to it. How you want to handle the database password is up to you and your risk tolerance for your particular situation.
We’re also using the DockerHub version of SuperTokens’ MySQL container and telling it where to find our SuperTokens server. You might be wondering why we’re not exposing any ports for SuperTokens – that’s because all communication with SuperTokens is brokered through our FastAPI app, which we’ll get into later. This is convenient, because your frontend React app only has to ever talk to your API server.
The SuperTokens MongoDB image does not support user accounts, only sessions. If you attempt to use it for user accounts, you’ll get an error that’s pretty hard to track down.
Adding the SuperTokens packages for Python and React
In our requirements.txt file, we just need to add one package for SuperTokens support:
fastapi
strawberry-graphql
supertokens-python
uvicorn[standard]This can also be installed via pip if you’re not using a docker compose setup with this command:
pip install supertokens-pythonWe also need to add the supertokens-auth-react package to our frontend:
  "dependencies": {
    "@testing-library/jest-dom": "^5.16.5",
    "@testing-library/react": "^13.4.0",
    "@testing-library/user-event": "^13.5.0",
    "react": "^18.2.0",
    "react-dom": "^18.2.0",
    "react-router-dom": "^6.8.1",
    "react-scripts": "5.0.1",
    "supertokens-auth-react": "^0.31.1",
    "urql": "^3.0.3",
    "web-vitals": "^2.1.4"
  },
  "scripts": {
"start": "react-scripts start",You can do that with the following npm command:
npm install supertokens-auth-reactThe Backend
Our backend changes happen all within the main.py file:
import os

import strawberry
import uvicorn
from fastapi import FastAPI, Depends
from starlette.middleware.cors import CORSMiddleware

from strawberry.fastapi import GraphQLRouter

from supertokens_python import init, InputAppInfo, SupertokensConfig, get_all_cors_headers
from supertokens_python.framework.fastapi import get_middleware
from supertokens_python.recipe import emailpassword, session
from supertokens_python.recipe.session.framework.fastapi import verify_session

from gql import Query, Mutation


init(
    app_info=InputAppInfo(
        app_name="example",
        api_domain=f"http://{os.getenv('HOSTNAME')}:8000",
        website_domain=f"http://{os.getenv('HOSTNAME')}:3000",
        api_base_path="/auth",
        website_base_path="/auth"
    ),
    supertokens_config=SupertokensConfig(
        connection_uri="http://supertokens:3567",
    ),
    framework='fastapi',
    recipe_list=[
        session.init(),
        emailpassword.init(),
    ],
    mode='wsgi'
)


app = FastAPI()
app.add_middleware(get_middleware())
app.add_middleware(
            CORSMiddleware,
            allow_origins=[f"http://{os.getenv('HOSTNAME')}:3000"],
            allow_credentials=True,
            allow_methods=["GET", "PUT", "POST", "DELETE", "OPTIONS", "PATCH"],
            allow_headers=["Content-Type"] + get_all_cors_headers(),
        )

schema = strawberry.Schema(query=Query, mutation=Mutation)
app.include_router(
        GraphQLRouter(schema),
        prefix="/graphql",
        dependencies=[Depends(verify_session())]
)

if __name__ == "__main__":
    reload = os.getenv("PROD") != "1"
uvicorn.run("main:app", host="0.0.0.0", reload=reload)It looks like a lot of code was added, so let’s take a look at each part individually and I’ll explain what’s happening. Make note of the imports at the top.
Configuring SuperTokens for FastAPI
After importing the necessary packages, we need to configure SuperTokens to work with FastAPI:
from gql import Query, Mutation


init(
    app_info=InputAppInfo(
        app_name="example",
        api_domain=f"http://{os.getenv('HOSTNAME')}:8000",
        website_domain=f"http://{os.getenv('HOSTNAME')}:3000",
        api_base_path="/auth",
        website_base_path="/auth"
    ),
    supertokens_config=SupertokensConfig(
        connection_uri="http://supertokens:3567",
    ),
    framework='fastapi',
    recipe_list=[
        session.init(),
        emailpassword.init(),
    ],
    mode='wsgi'
)


app = FastAPI()
app.add_middleware(get_middleware())
Here, we’re telling the SuperTokens Python SDK where to find the SuperTokens server, where our API lives, and where our requests to that API will be coming from. If you’re confused about the calls to os.getenv, check take a closer look at the Makefile and docker compose file in the GitHub repo to see how we’re passing that information in.
SuperTokens also has a concept called “recipes” which are convenient pre-configurations for common use cases. We’re going to be using the emailpassword recipe, which, as the name implies, adds a simple email and password authentication mechanism to your site. We’re also using the session recipe, which tracks a user’s log-in status even if they leave the site.
Last but not least, we’re setting the mode to wsgi since we’re using the uvicorn web server to serve up our FastAPI app.
Adding the FastAPI middleware for SuperTokens
Now, in order to get all that configuration up there in your FastAPI app, we need to install some middleware:
app = FastAPI()
app.add_middleware(get_middleware())
app.add_middleware(
            CORSMiddleware,
            allow_origins=[f"http://{os.getenv('HOSTNAME')}:3000"],
allow_credentials=True,This one line adds all the functionality your app needs to communicate with the SuperTokens server. You don’t need to manually mess with sessions, tokens, expired tokens, etc., which is one thing I really love about SuperTokens compared to other solutions.
Configuring FastAPI CORS middleware for SuperTokens
In order to prevent CORS errors, we also need to configure that middleware to work with SuperTokens. Luckily the SDK makes that easy as well:
app = FastAPI()
app.add_middleware(get_middleware())
app.add_middleware(
            CORSMiddleware,
            allow_origins=[f"http://{os.getenv('HOSTNAME')}:3000"],
            allow_credentials=True,
            allow_methods=["GET", "PUT", "POST", "DELETE", "OPTIONS", "PATCH"],
            allow_headers=["Content-Type"] + get_all_cors_headers(),
        )

schema = strawberry.Schema(query=Query, mutation=Mutation)
app.include_router(GraphQLRouter(schema), prefix="/graphql", dependencies=[Depends(verify_session())])

if __name__ == "__main__":
    reload = os.getenv("PROD") != "1"
uvicorn.run("main:app", host="0.0.0.0", reload=reload)As you might expect if you’re familiar with CORS already, we need to tell our backend API to expect requests to come from our frontend React app. We also explicitly set the methods allowed here. Before, we could get away with just allowing POST since that’s all GraphQL needs, but since we’re using SuperTokens, we need to add a few more.
We also set the allowed headers to “Content-Type”, plus everything that SuperTokens needs, which is conveniently retrieved with the get_all_cors_headers method.
Securing your FastAPI routes with SuperTokens
Securing routes is dead simple as well:
schema = strawberry.Schema(query=Query, mutation=Mutation)
app.include_router(
        GraphQLRouter(schema),
        prefix="/graphql",
        dependencies=[Depends(verify_session())]
)

if __name__ == "__main__":Using the Depends mechanism in FastAPI, we secure our one and only application route, /graphql. If you’re using a regular REST setup instead of GraphQL, you’ll have to do this for each route you want to require a user session for.
The Frontend
The backend setup was pretty easy, and the frontend setup is no different. Highlighted below is the bulk of the configuration needed to use SuperTokens in your React app:
import { Provider } from "urql";
import { urqlClient } from "./utils";
import { BrowserRouter } from "react-router-dom";

import SuperTokens from "supertokens-auth-react";
import EmailPassword from "supertokens-auth-react/recipe/emailpassword";
import Session from "supertokens-auth-react/recipe/session";
import { SuperTokensWrapper } from "supertokens-auth-react";

import Main from "./Main";

SuperTokens.init({
    appInfo: {
        appName: "example",
        apiDomain: `http://${process.env.REACT_APP_HOSTNAME}:8000`,
        websiteDomain: `http://${process.env.REACT_APP_HOSTNAME}:3000`,
        apiBasePath: "/auth",
        websiteBasePath: "/auth",
    },
    recipeList: [
        EmailPassword.init(),
        Session.init()
    ]
});


function App() {
    return (
        <SuperTokensWrapper>
            <Provider value={urqlClient}>
                <BrowserRouter>
                    <Main />
                </BrowserRouter>
            </Provider>
        </SuperTokensWrapper>
    );
}

export default App;We’ll look at each of these in more detail in a minute.
We also added a Main.js page, since any SuperTokens session interaction needs to take place within the SuperTokensWrapper:
import { getSuperTokensRoutesForReactRouterDom } from "supertokens-auth-react";
import { signOut } from "supertokens-auth-react/recipe/emailpassword";
import { SessionAuth, useSessionContext } from 'supertokens-auth-react/recipe/session';
import {
    Routes,
    Route,
    Link,
    useNavigate,
} from "react-router-dom";
import * as reactRouterDom from "react-router-dom";

import HomePage from "./HomePage";

export default function Main() {
    const {loading, doesSessionExist} = useSessionContext();
    const navigate = useNavigate();
    const onSignOut = async () => {
        await signOut();
        navigate("/auth");
    }

    return (
        <div id="main">
            <div id="menu">
                <ul>
                    <li><Link to="/">Home</Link></li>
                    <li>
                        { !loading &&
                            doesSessionExist
                                ? <button onClick={onSignOut}>Sign Out</button>
                                : <Link to="/auth">Sign In</Link>
                        }
                    </li>
                </ul>
            </div>
            <Routes>
                <Route path="/" element={
                    <SessionAuth>
                        <HomePage />
                    </SessionAuth>
                } />
                {getSuperTokensRoutesForReactRouterDom(reactRouterDom)}
            </Routes>
        </div>
    );
}Again, we’ll discuss everything highlighted here in more detail in just a minute.
Configuring SuperTokens for ReactJS
The first thing we need to do in our App.js is to configure SuperTokens:
import Main from "./Main";

SuperTokens.init({
    appInfo: {
        appName: "example",
        apiDomain: `http://${process.env.REACT_APP_HOSTNAME}:8000`,
        websiteDomain: `http://${process.env.REACT_APP_HOSTNAME}:3000`,
        apiBasePath: "/auth",
        websiteBasePath: "/auth",
    },
    recipeList: [
        EmailPassword.init(),
        Session.init()
    ]
});

function App() {This should look very familiar. It’s basically the same as our Python configuration, minus the need to specify where to find the SuperTokens server. Your frontend doesn’t need to know where the SuperTokens server is, because all communication with it is brokered through your FastAPI app. This greatly simplifies your app structure compared to more heavyweight solutions such as KeyCloak.
Adding the SuperTokens context to your app
The SuperTokensWrapper element needs to wrap all components that need access to session data:
function App() {
    return (
        <SuperTokensWrapper>
            <Provider value={urqlClient}>
                <BrowserRouter>
                    <Main />
                </BrowserRouter>
            </Provider>
        </SuperTokensWrapper>
    );
}Simply wrap all components with this tag at the highest level that makes sense for your app. For us, it’s App.js.
Securing your ReactJS Routes and adding the SuperTokens routes
Now let’s take a look at the new Main.js file.
If you’re not familiar with react-router-dom, check out or guide and come back. Even if you’re not using it in your app, the SessionAuth component is what you’d wrap any component that you want protected by SuperTokens authentication:
            <Routes>
                <Route path="/" element={
                    <SessionAuth>
                        <HomePage />
                    </SessionAuth>
                } />
                {getSuperTokensRoutesForReactRouterDom(reactRouterDom)}
</Routes>Since we are using react-router-dom, we also can get the login page (included with the SuperTokens React SDK) added with the absurdly long-winded function named getSuperTokensRoutesForReactRouterDom, as seen above. This will add a route for /auth.
Detecting if the user is signed in
As mentioned earlier, we need to do all session related stuff from inside the SuperTokensWrapper component, so we create our rudimentary menu system in the Main.js component:
export default function Main() {
    const {loading, doesSessionExist} = useSessionContext();
    const navigate = useNavigate();
    const onSignOut = async () => {
        await signOut();
        navigate("/auth");
    }

    return (
        <div id="main">
            <div id="menu">
                <ul>
                    <li><Link to="/">Home</Link></li>
                    <li>
                        { !loading &&
                            doesSessionExist
                                ? <button onClick={onSignOut}>Sign Out</button>
                                : <Link to="/auth">Sign In</Link>
                        }
                    </li>
                </ul>
</div>The SuperTokens React SDK comes with a hook that will get you important session information, such as the user ID and session status. Above, we’re using that to either display a link to the login page, or a button to sign out, depending on if the user is currently signed in or not.
Note that we’re using a button to sign out and not a link. This might look a little funny, but it’s best practice since we’re not actually trying to navigate anywhere; rather, the navigation is a side-effect of signing out and takes place in the onSignOut function. Creating a <a> tag instead and setting href to # will give you an annoying warning from WebPack.
Signing out
The SDK also comes with a convenient sign-out function:
export default function Main() {
    const {loading, doesSessionExist} = useSessionContext();
    const navigate = useNavigate();
    const onSignOut = async () => {
        await signOut();
        navigate("/auth");
    }

    return (
        <div id="main">
            <div id="menu">
                <ul>
                    <li><Link to="/">Home</Link></li>
                    <li>
                        { !loading &&
                            doesSessionExist
                                ? <button onClick={onSignOut}>Sign Out</button>
                                : <Link to="/auth">Sign In</Link>
                        }
                    </li>
                </ul>
</div>It’s asynchronous, so we have to do a little more legwork to get it to behave properly. When the user clicks the “sign out” button, we wait for the signOut function to complete, then navigate them to the /auth route to show them the login page.
We’re using the useNavigate hook from react-router-dom to navigate the user to the login page after signing out. This must be used within a Router component, or you’ll get an error!
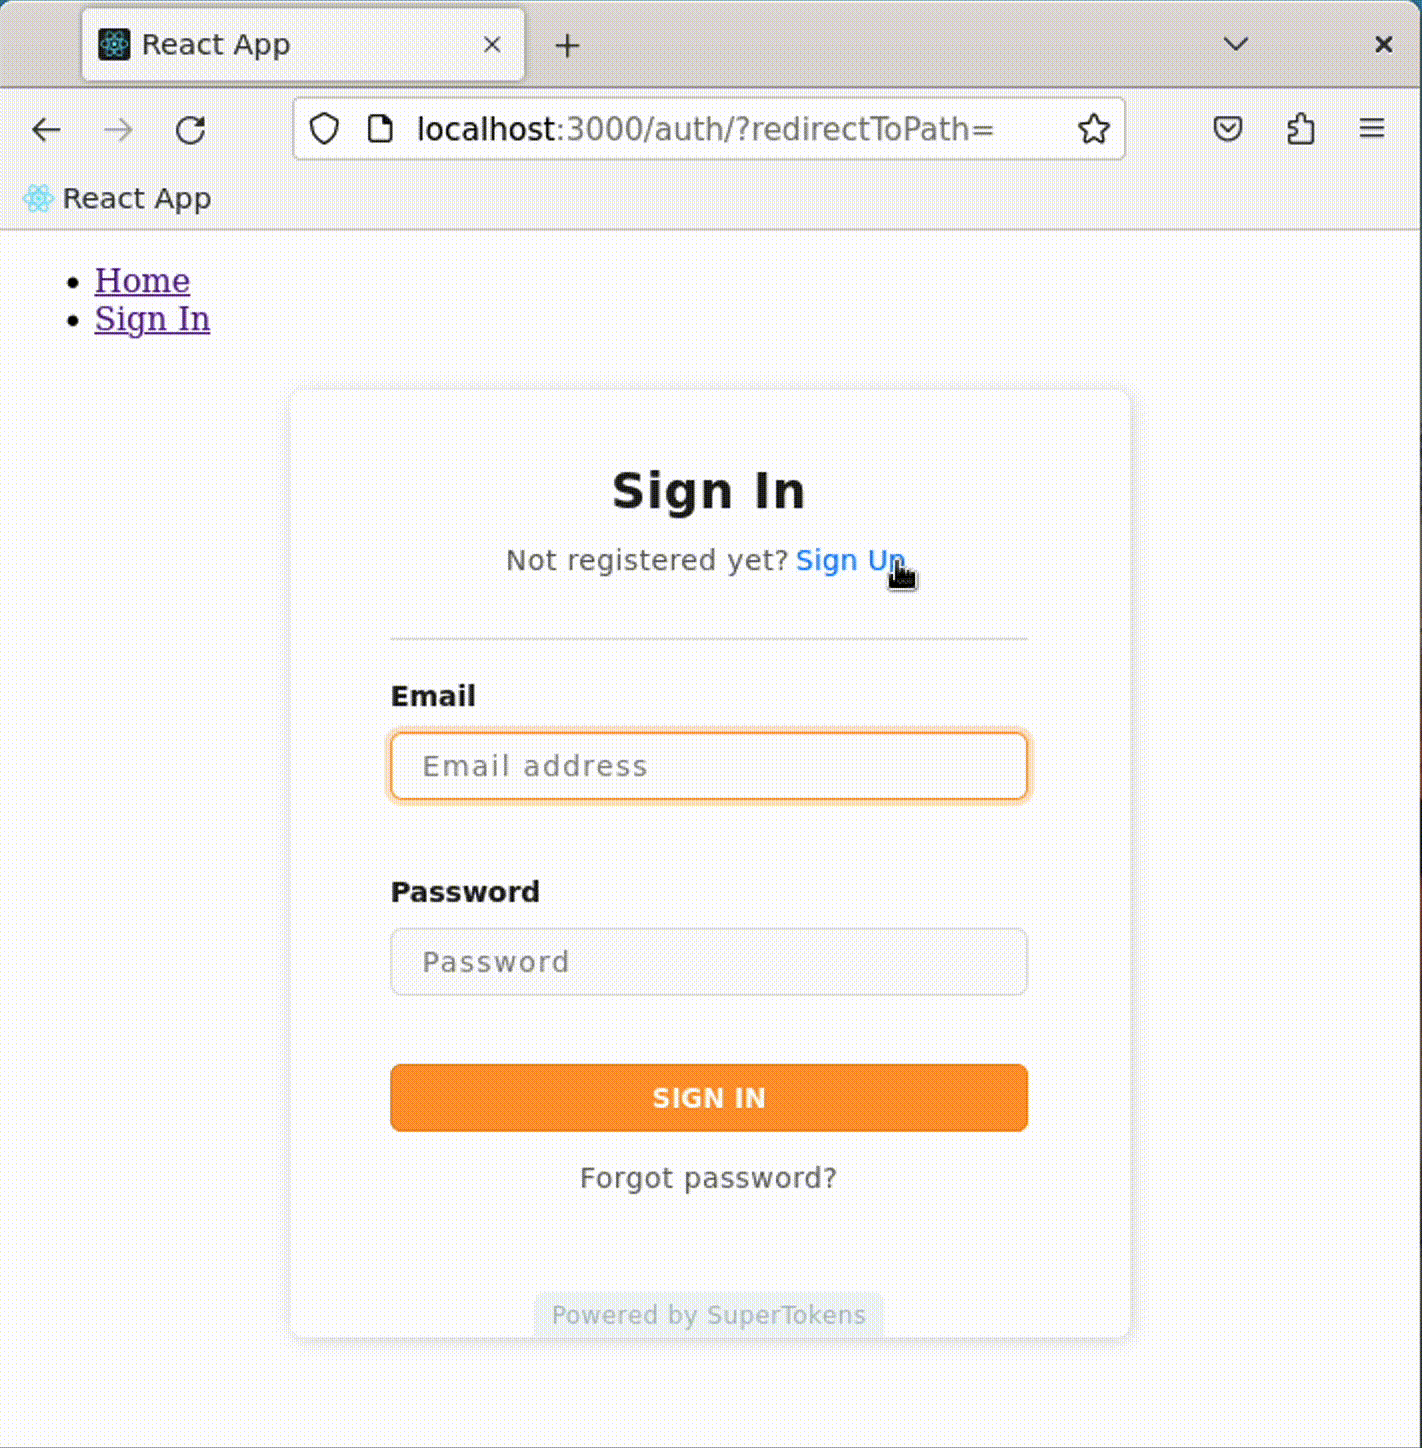
The finished product
Finally, here’s how it looks and behaves:
Yes, it’s simple, but it’s a great starting point for your own apps. It also illustrates the power and simplicity of SuperTokens, which can add a secure way to authenticate your users with a minimum of code. Plus, its code that you don’t have to maintain yourself, so that’s always a plus.

John is a professional software engineer who has been solving problems with code for 15+ years. He has experience with full stack web development, container orchestration, mobile development, DevOps, Windows and Linux kernel development, cybersecurity, and reverse engineering. In his spare time, he’s researching the potential business applications of AI.